All,


Integrating Silver Light with SharePoint is now one of the most Google key words and none of the tutorials are good enough to provide all the stuff, i decided to make some time and write this post and i hope it will help someone.


Note : This is with Silver Light 2.0 i will work on latest versions and will update soon.


Here we go..


1.Download the latest Silver Light go to http://silverlight.net/GetStarted/
2.Download the SilverLight SDK
(http://www.microsoft.com/downloads/details.aspx?FamilyId=8D933343-
038F-499C-986C-C3C7E87A60B3&displaylang=en)
3.Download and install .NET 3.5
(http://www.microsoft.com/downloads/details.aspx?FamilyId=333325FDAE52-
4E35-B531-508D977D32A6&displaylang=en)
4.Download and install the SP2 of WSS
(http://www.microsoft.com/downloads/details.aspx?FamilyId=79BADA8
2-C13F-44C1-BDC1-D0447337051B&displaylang=en)
5.Download and install the SP2 of MOSS
(http://www.microsoft.com/downloads/details.aspx?familyid=B7816D90-
5FC6-4347-89B0-A80DEB27A082&displaylang=en)


Installation :
Once you are with the requirements install the Silver Light SDK.
Copy DLL’s to the GAC


1. Drag the “C:\Program Files\Microsoft
SDKs\Silverlight\v2.0\Libraries\Server\System.Web.SilverLight.dll” to
“C:\Windows\Assembly”
NOTE: Sometimes simply copying to the GAC doesn’t work for SP
You will need to copy to local bin directory of the web application.
2. Copy the “C:\Program Files\Microsoft
SDKs\Silverlight\v2.0\Libraries\Server\System.Web.SilverLight.dll” to the
“C:\inetpub\wwwroot\wss\virtualdirectories\100\bin”


1. Create a folder called “ClientBin” in the
“C:\Inetpub\wwwroot\wss\VirtualDirectories\100” directory
2. Open IIS Manager
3. Expand SHAREPOINT2007

4. Expand “Web Sites”
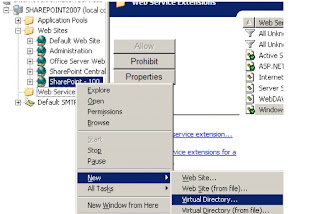
5. Right click “SharePoint – 100”, select “New->Virtual Directory”


6. Click “Next”
7. For “Alias”, type “ClientBin”


8. Click “Next”
9. For path, type “C:\Inetpub\wwwroot\wss\VirtualDirectories\100\ClientBin”
10. Click “Next”
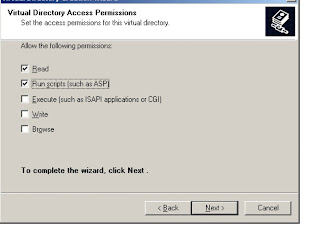
11. Click “Run scripts (such as ASP)” checkbox


12. Click “Next”
13. Click “Finish”

Task 2 – Setup MIME Types
1. Right click “ClientBin”, select “Properties”
2. Select “HttpHeaders” tab
3. Click “MIME Types”


4. Add three MIME types:
o Click “New”
o Set Extension and MIME Type for each of the following:
1. .xaml application/xaml+xml
2. .xap application/x-silverlight-app
3. .xbap application/x-ms-xbap
Click “Ok”

Task 3 – Copy SilverLight JavaScript Files
1. Copy the “C:\Program Files\Microsoft
SDKs\Silverlight\v2.0\Tools\SilverLight.js” file to
“C:\Inetpub\wwwroot\wss\VirtualDirectories\100\ClientBin”
Task 4 – Configure web.config
1. Open the “C:\Inetpub\wwwroot\wss\VirtualDirectories\100\web.config” file

2. Add the following sectionGroup to the \Configuration\configSections element:


type="System.Web.Configuration.SystemWebExtensionsSectionGroup,
System.Web.Extensions, Version=3.5.0.0, Culture=neutral,
PublicKeyToken=31BF3856AD364E35">

type="System.Web.Configuration.ScriptingSectionGroup, System.Web.Extensions,
Version=3.5.0.0, Culture=neutral, PublicKeyToken=31BF3856AD364E35">

type="System.Web.Configuration.ScriptingScriptResourceHandlerSection,
System.Web.Extensions, Version=3.5.0.0, Culture=neutral,
PublicKeyToken=31BF3856AD364E35" requirePermission="false"
allowDefinition="MachineToApplication" />

type="System.Web.Configuration.ScriptingWebServicesSectionGroup,
System.Web.Extensions, Version=3.5.0.0, Culture=neutral,
PublicKeyToken=31BF3856AD364E35">

type="System.Web.Configuration.ScriptingJsonSerializationSection,
System.Web.Extensions, Version=3.5.0.0, Culture=neutral,
PublicKeyToken=31BF3856AD364E35" requirePermission="false"
allowDefinition="Everywhere" />

type="System.Web.Configuration.ScriptingProfileServiceSection,
System.Web.Extensions, Version=3.5.0.0, Culture=neutral,
PublicKeyToken=31BF3856AD364E35" requirePermission="false"
allowDefinition="MachineToApplication" />

type="System.Web.Configuration.ScriptingAuthenticationServiceSection,
System.Web.Extensions, Version=3.5.0.0, Culture=neutral,
PublicKeyToken=31BF3856AD364E35" requirePermission="false"
allowDefinition="MachineToApplication" />

type="System.Web.Configuration.ScriptingRoleServiceSection, System.Web.Extensions,
Version=3.5.0.0, Culture=neutral, PublicKeyToken=31BF3856AD364E35"
requirePermission="false" allowDefinition="MachineToApplication" />


3. Add the following to the SafeControls section:


PublicKeyToken=31bf3856ad364e35" Namespace="System.Web.UI" TypeName="*"
Safe="True" />
PublicKeyToken=31bf3856ad364e35" Namespace="System.Web.UI.SilverlightControls"
TypeName="*" Safe="True" />


4. Add the following HttpHandlers to the end of the \system.web\httpHandler
section:


type="System.Web.Script.Services.ScriptHandlerFactory, System.Web.Extensions,
Version=3.5.0.0, Culture=neutral, PublicKeyToken=31BF3856AD364E35" />
type="System.Web.Script.Services.ScriptHandlerFactory, System.Web.Extensions,
Version=3.5.0.0, Culture=neutral, PublicKeyToken=31BF3856AD364E35" />
type="System.Web.Handlers.ScriptResourceHandler, System.Web.Extensions,
Version=3.5.0.0, Culture=neutral, PublicKeyToken=31BF3856AD364E35"
validate="false" />


5. Add the following assemblies to \system.web\compliation\assemblies:


6. Add the following to the \system.web\pages\ element:


assembly="System.Web.Extensions, Version=3.5.0.0, Culture=neutral,
PublicKeyToken=31BF3856AD364E35" />
assembly="System.Web.Extensions, Version=3.5.0.0, Culture=neutral,
PublicKeyToken=31BF3856AD364E35" />


7.Add the following after the end element of “system.net”


type="System.Web.Handlers.ScriptModule, System.Web.Extensions, Version=3.5.0.0,
Culture=neutral, PublicKeyToken=31BF3856AD364E35" />
preCondition="integratedMode"
type="System.Web.Script.Services.ScriptHandlerFactory, System.Web.Extensions,
Version=3.5.0.0, Culture=neutral, PublicKeyToken=31BF3856AD364E35" />
preCondition="integratedMode"
type="System.Web.Script.Services.ScriptHandlerFactory, System.Web.Extensions,
Version=3.5.0.0, Culture=neutral, PublicKeyToken=31BF3856AD364E35" />
path="ScriptResource.axd" type="System.Web.Handlers.ScriptResourceHandler,
System.Web.Extensions, Version=3.5.0.0, Culture=neutral,
PublicKeyToken=31BF3856AD364E35" />


Perform IISRESET ( Its better but not compulsory)

Now we need to edit default.aspx using SPD or VS

1.Replace (or Add) the ScriptManager with the following:


Assembly="System.Web.Silverlight"/>


2.Modify the Silverlight control to:


Height="340"
Width="320"
Source="../Shared Documents/calculator.xaml"
ScriptType="Custom.yourprogram"
OnPluginError="errorHandler"/>


3.Add the following script tag above the silverlight control:


function errorHandler(sender, args)
{
alert(args._error.errorType);
alert(args._error.errorCode);
alert(args._error.errorMessage);
}

4.Add the following register directive to the top of the page:


<%@ Register Assembly="System.Web.Silverlight"
Namespace="System.Web.UI.SilverlightControls" TagPrefix="asp" %>

5.Refresh the page in the browser, you should see your new silverlight application!


Example :

1. You can download .xap files from the SharePoint Blueprint
http://www.codeplex.com/SL4SP
2. Upload the .xap file to your “Shared Documents” library
3. Change the SilverLight control to point to the .xap file

Height="340"
Width="320"
Source="/Shared Documents/HelloWorldRTM.xap"
ScriptType="Custom.yourprogram" //This is optional here.
OnPluginError="errorHandler"/>

4.Refresh the sharepoint site!

Output:

 Wola!!!!


By Indra

SharePoint Architect

Leave a Reply